Ok... now start the staff Part 1
I think that next to the makeup to complete the mask effect; creating the staff is going to be the toughest part.
Its really a headpiece on a simple pole so obviously the pole will not be an issue here.
I started making the gem for the center of the staff. I had many ideas on what I wanted it to look like but most of them have been shelved for the sake of time. Mostly because the work I've been putting into it has proved to be a large series of setbacks and delays.
First I tried to see if there was some large plastic gem from some child's toy that would work. Unfortunately that was a fruitless effort. While I had fun looking around the local Toys'r'us it wasn't going to pan out.
I was also looking for something that was the shape I needed even if it was made from another material. If it was hollow I could use it as a mold and if it was solid I could use it as an 'original' to create a mold around. Well it turns out I wasn't lucky at all and this was going to have to be done the hard way.
So, I finally broke down and bought some clay and wire mesh. But wait... how big do I make it and what proportions should I use? Well I sat down with Corel Draw and started to map it out.
This is the size of the facet that I came up with.
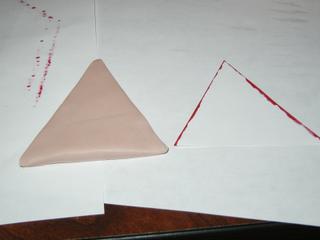
I eventually found the size I wanted and was able to create the wire mesh form for it.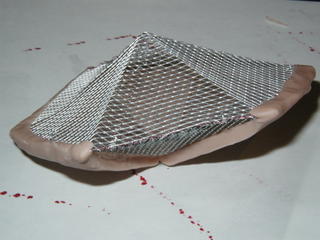
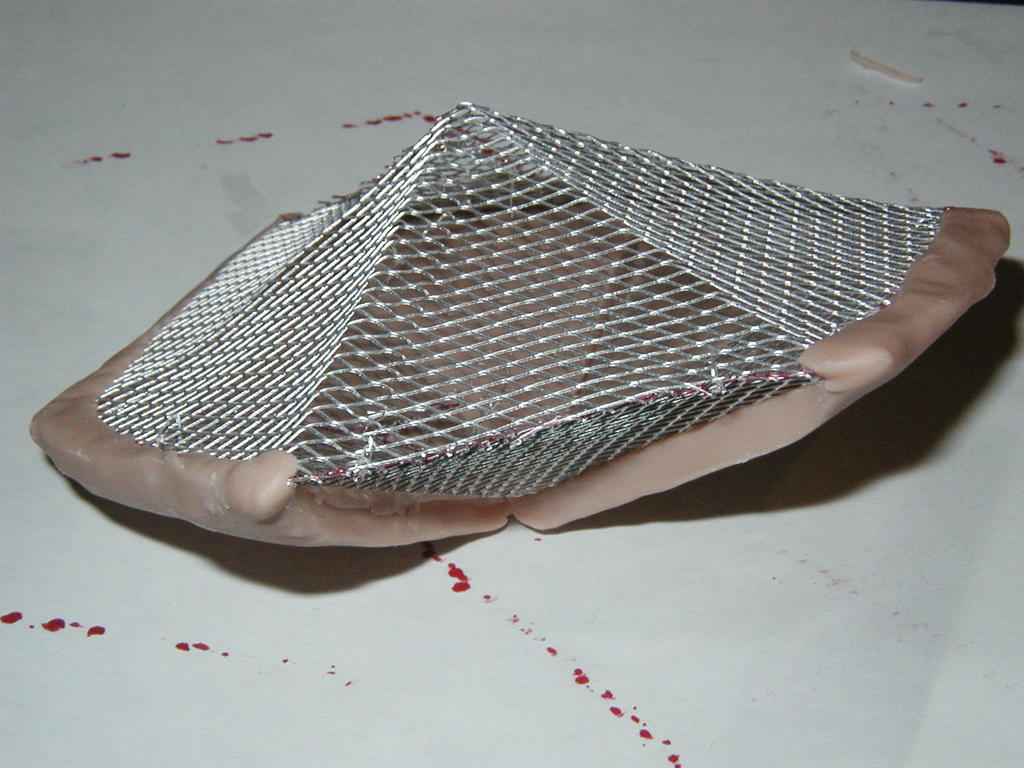
Note the lack of anything in the middle of the mesh. BAD IDEA! I was up late when I made this and didn't realize how much abuse this form was going to take before I was done. It stood up well enough but would have been better with something inside like a wad of mesh(NOTHING THAT WOULD BURN!!). Or even just use a large ball of clay and cut out the basic shape of the gem and then finish it.
Did I mention that I've only played with clay once before? Sure I've had my fun with PlayDoh but that is nothing compared to this since I needed to get this right the first time.
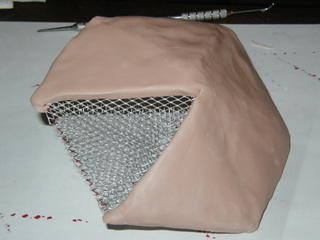
Once I was done I noticed that it was ALL lopsided, so I started to straighten it out and that started to make it worse since the amount of clay I put over the mesh varied and the mesh started to show through.
So I slapped on some more clay to cover up the bald spots and dropped it into the oven. This clay is oven baked so that's why you cant use anything that would burn in the center. The good thing about using this mesh form was that it was thin enough to only take about 15 minutes in the oven to bake. The following day I took the gem and applied it to my small tabletop belt sander and was able to salvage something out of it.
Its really a headpiece on a simple pole so obviously the pole will not be an issue here.
I started making the gem for the center of the staff. I had many ideas on what I wanted it to look like but most of them have been shelved for the sake of time. Mostly because the work I've been putting into it has proved to be a large series of setbacks and delays.
First I tried to see if there was some large plastic gem from some child's toy that would work. Unfortunately that was a fruitless effort. While I had fun looking around the local Toys'r'us it wasn't going to pan out.
I was also looking for something that was the shape I needed even if it was made from another material. If it was hollow I could use it as a mold and if it was solid I could use it as an 'original' to create a mold around. Well it turns out I wasn't lucky at all and this was going to have to be done the hard way.
So, I finally broke down and bought some clay and wire mesh. But wait... how big do I make it and what proportions should I use? Well I sat down with Corel Draw and started to map it out.
This is the size of the facet that I came up with.

I eventually found the size I wanted and was able to create the wire mesh form for it.

Note the lack of anything in the middle of the mesh. BAD IDEA! I was up late when I made this and didn't realize how much abuse this form was going to take before I was done. It stood up well enough but would have been better with something inside like a wad of mesh(NOTHING THAT WOULD BURN!!). Or even just use a large ball of clay and cut out the basic shape of the gem and then finish it.
Did I mention that I've only played with clay once before? Sure I've had my fun with PlayDoh but that is nothing compared to this since I needed to get this right the first time.
Once I was done I noticed that it was ALL lopsided, so I started to straighten it out and that started to make it worse since the amount of clay I put over the mesh varied and the mesh started to show through.
So I slapped on some more clay to cover up the bald spots and dropped it into the oven. This clay is oven baked so that's why you cant use anything that would burn in the center. The good thing about using this mesh form was that it was thin enough to only take about 15 minutes in the oven to bake. The following day I took the gem and applied it to my small tabletop belt sander and was able to salvage something out of it.
posted by Unfriendly Pedestrian at Tuesday, October 18, 2005
![]()
![]()


0 Comments:
Post a Comment
<< Home